Managing Fields
Where to find it
Sidebar > Entities > [Object] > Edit > Fields
Managing Fields
Custom fields define the data you capture and store for each lead. This guide covers how to add, edit, reorder, and delete fields, plus an overview of field types and properties.
Accessing Field Management
- Go to Entities in the sidebar.
- Select the Entity you want to configure.
- Open Edit (or the pencil icon).
- Navigate to the Fields tab or section.
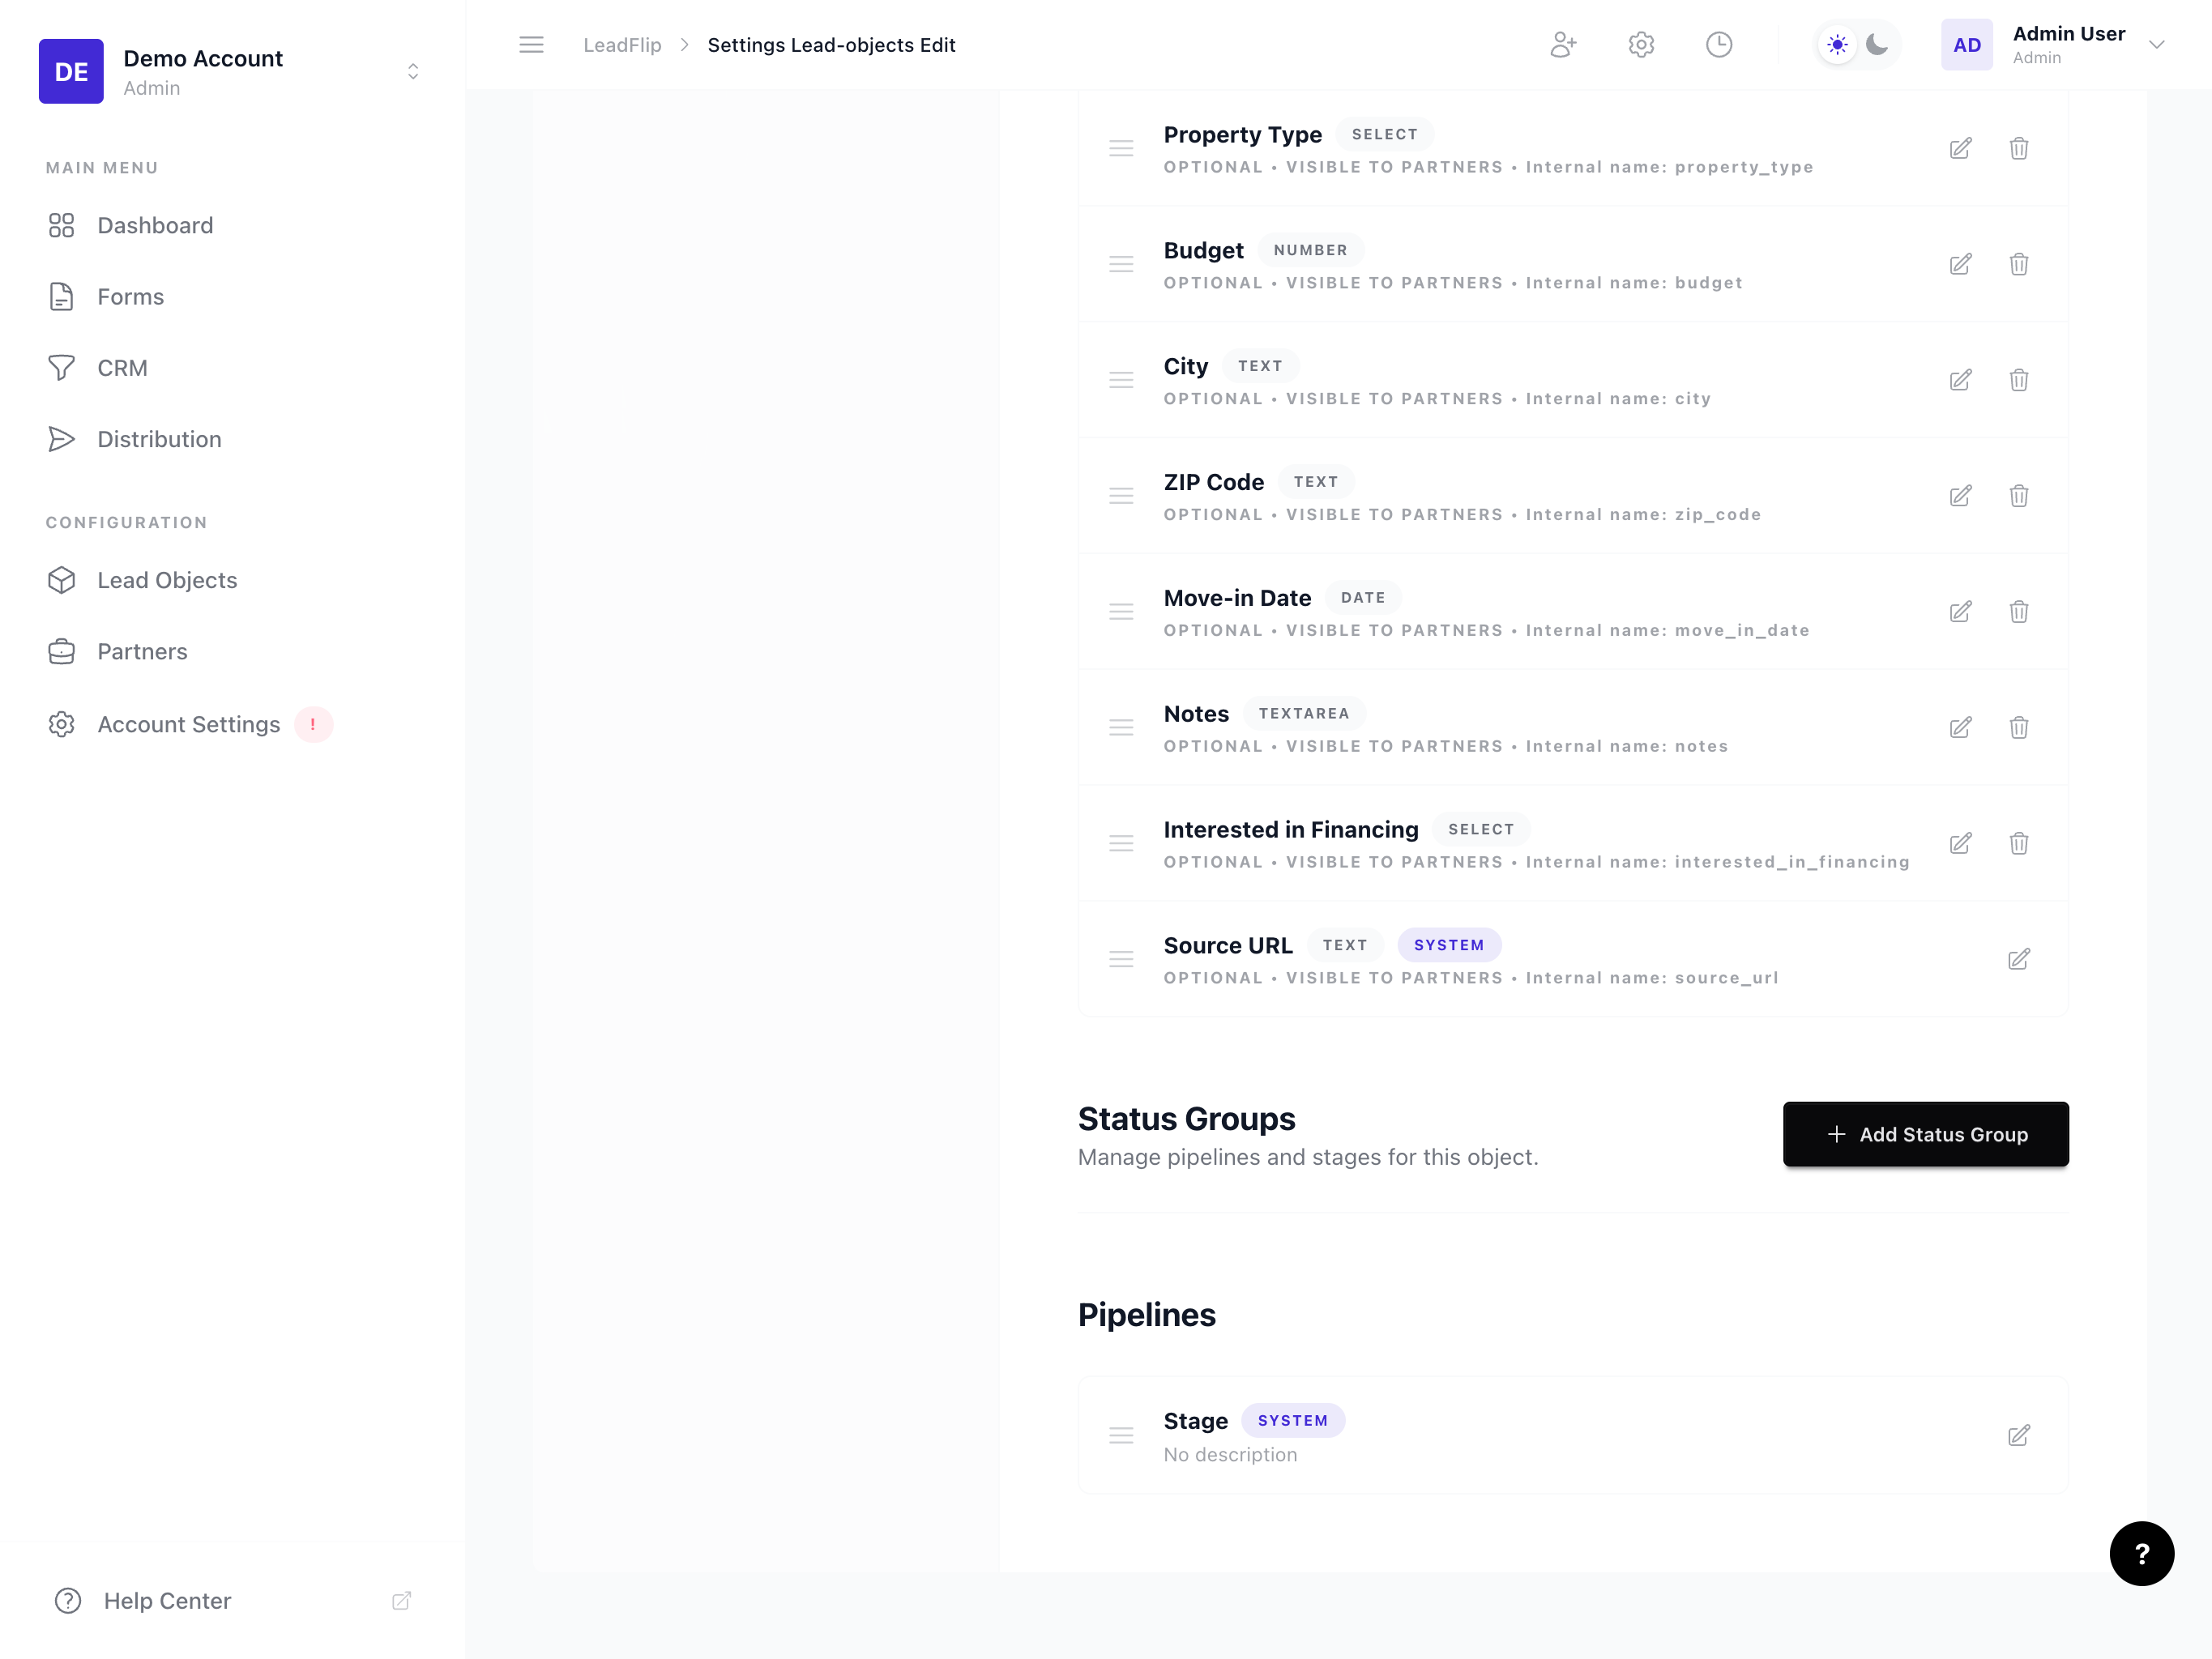
Field Properties
Every custom field has these properties:
| Property | Description |
|---|---|
| Label | Human-readable name shown in forms, CRM, and exports (e.g., "Email Address") |
| Key | Internal identifier used in API, filters, and conditions (e.g., email). Must be unique per Entity. |
| Type | The data type (text, number, email, etc.). See Field Types below |
| Required | If true, the field must have a value before the lead can be saved |
| Default value | Optional value pre-filled for new leads |
| Encrypted | If true, the field is stored with AES-256-CBC encryption (see Field Encryption) |
Note: System fields (created_at, updated_at, source) cannot be edited or removed.
Field Types
Text
Single-line text input. Use for names, short descriptions, or free-form text.
- Max length – Optional character limit
- Placeholder – Hint text shown in empty inputs
Number
Numeric values (integers or decimals). Use for quantities, prices, or IDs.
- Min / Max – Optional range validation
- Step – For decimals (e.g., 0.01 for currency)
Email address with format validation. Use for contact emails.
Phone
Phone number. May support formatting (e.g., (555) 123-4567) depending on configuration.
Date
Date picker. Use for birthdays, deadlines, or event dates.
- Format – Display format (e.g., MM/DD/YYYY)
Select (Dropdown)
Single choice from a predefined list. Use for "Property Type", "Lead Source", etc.
- Options – List of key-value pairs (e.g.,
residential→ "Residential",commercial→ "Commercial")
Multi-Select
Multiple choices from a predefined list. Use for "Interests", "Services Needed", etc.
- Options – Same as Select
- Max selections – Optional limit
Textarea
Multi-line text. Use for notes, comments, or longer descriptions.
- Rows – Default height in lines
Checkbox
Boolean (true/false). Use for "Opt-in to newsletter", "Is qualified", etc.
- Default – Checked or unchecked for new leads
File
File upload. Use for documents, images, or attachments.
- Accepted types – Optional restriction (e.g., PDF, images only)
- Max size – Optional file size limit
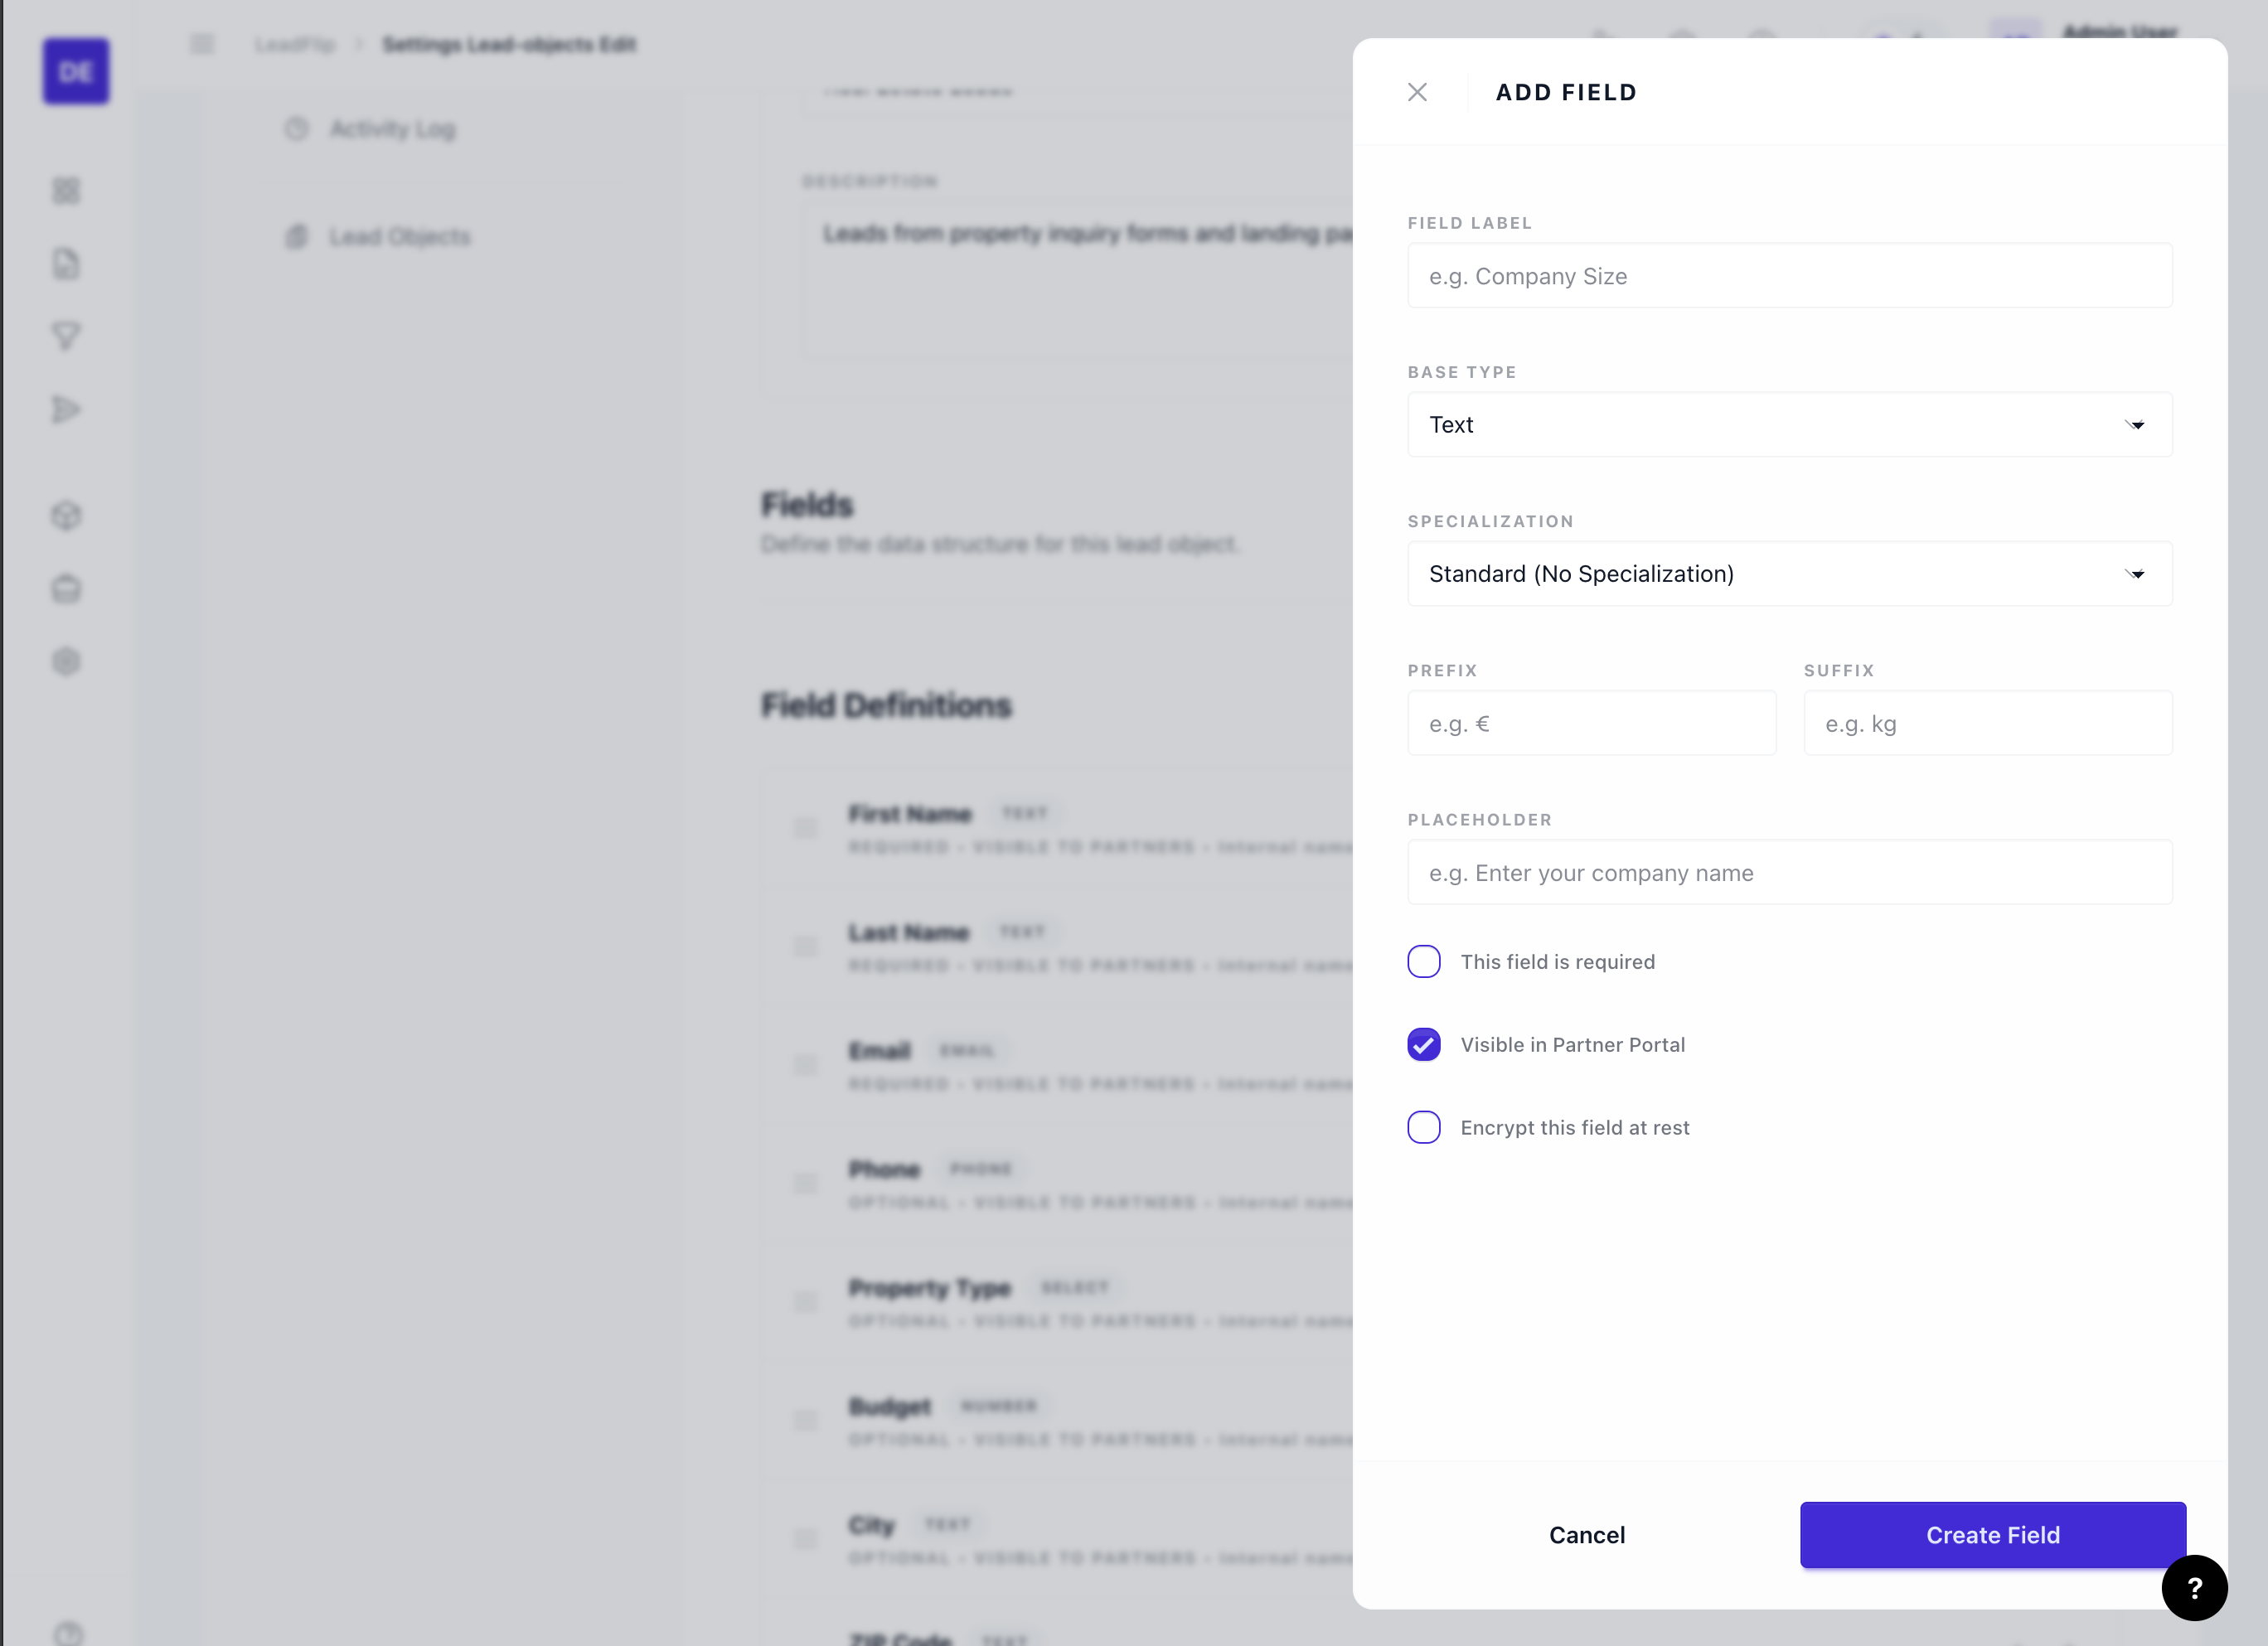
Adding a New Field
- In the Fields section, click Add Field or + New Field.
- Enter the Label (e.g., "Email Address").
- The Key is often auto-generated from the label (e.g.,
email_address). Edit if needed. Keys should be lowercase, use underscores, and avoid spaces. - Select the Type.
- Set Required if the field must always have a value.
- Optionally set a Default value.
- For Select/Multi-Select, add your options.
- Click Save or Add.
Editing a Field
- Find the field in the list and click Edit (pencil icon) or the field name.
- Update any properties (label, type, required, default, options).
- Caution: Changing the Key can break forms, filters, and automation that reference it. Prefer adding a new field if the key needs to change.
- Click Save.
Reordering Fields
Field order affects how fields appear in forms, CRM cards, and exports.
- Use drag-and-drop handles (if available) to reorder fields.
- Or use Move up / Move down buttons.
- Changes apply immediately or after clicking Save, depending on your UI.
Deleting a Field
- Find the field and click Delete (trash icon) or open the field and choose Delete.
- Confirm the action. Warning: Deleting a field removes all stored data for that field. This cannot be undone.
- Forms, filters, and automation that reference the field may need to be updated.
Tip: If you want to stop using a field but keep historical data, consider hiding it in the UI or renaming it to "Archived - [name]" instead of deleting.
Required vs Optional Fields
- Required – The lead cannot be saved without a value. Use for critical fields (email, name) that you always need.
- Optional – The field can be empty. Use for supplementary data (notes, secondary phone) that may not always be available.
Required fields are typically marked with an asterisk (*) in forms and validation messages.
Default Values
Default values are applied when creating a new lead. They do not update existing leads.
- Text/Number/Email/Phone – Pre-fill with a static value.
- Select – Pre-select one option.
- Checkbox – Pre-check or leave unchecked.
- Date – Optionally default to "today" or a fixed date.
Defaults are useful for standardizing data (e.g., default "Lead Source" to "Website") or reducing form friction.
Best Practices
- Use clear labels – "Email Address" is better than "Email1".
- Keep keys stable – Avoid changing keys after forms and automation are built.
- Limit required fields – Only require what you truly need; optional fields improve conversion.
- Group related fields – In forms, order fields logically (contact info first, then details).
- Use the right type – Email type enables validation; Select prevents typos; Number enables sorting/filtering.
Next Steps
- Set up status groups and pipelines
- Enable encryption for sensitive fields
- Create a form in the Form Builder that captures to this Entity